Shopify pixels - tracking visitor behavior
2/28/2023 · 6 minute read
In October 2022, Shopify published the new Customer Events feature. This changed how we use tracking pixels in Shopify websites, added an extra layer of security, and a much cleaner way to track user events.
But how does it change things exactly?
Update: In 2024, we have a lot more events available to track. Shopify pixels also have a new permissions feature, that lets them fire only when the user has given the appropriate permissions. Read more here.
Previous methods of pixel integration
Pixels are one or more snippets of tracking code that we add to a website. They track and analyze customer characteristics and behavior.
One reason we need them is to optimize ads. For example, Pinterest needs to know whether a user who clicked on your ad has purchased a product from your store. This information is critical for them to optimize ads delivery, and other reasons.
One example of a pixel is the TikTok pixel that you copy from TikTok into your store. We can consider the Google Tag Manager (GMT) or Google Analytics scripts to be pixels too.
Here are the standard ways of installing pixels:
1. Automated installation of pixels
Most times, you add these snippets in automated ways from the Shopify admin. Google Ads or GA4 pixels might be automatically added when you set up the Google sales channel, automatically handling features like Consent Mode. Meta’s pixel when you set up the Facebook & Instagram sales channel. And so on. Google’s Universal Analytics had a setting where you could paste the property ID.
2. Installation by apps
But some platforms don’t have automated integrations with Shopify. So an alternative is to use a third-party app.
3. Manual installation
But what if you don’t want to install an app? Or if there’s no app to support your marketing / ads platform? Then the only way is manual integration.
Manually integrating means adding code directly to the theme.
Here’s an example.
Let’s say our third party platform gives us a pixel. It looks something like this:
<script src=”https://ads.example.com/pixel.js”></script>
<script>
window.AdsEvents=window.AdsEvents || []
AdsEvents.push({event:“init”})
</script>
Your developer can paste this snippet into the theme.liquid file of your theme. Then, events might need to be set up. For example, an event could fire when the user adds a product to cart. The developer would add this script to the product template:
<script>
document.querySelector(“.add-to-cart-btn”, function() {
window.AdsEvents=window.AdsEvents || []
AdsEvents.push({event:“add_to_cart”})
})
</script>
You or your developer must manually complete this setup. (Which is much more complicated in reality).
The biggest problem?
Unless you have the Shopify Plus plan, you can’t add any code to track behavior on checkout.
You only have access to the order status / confirmation / thank you page via Settings / Checkout.
What changes with Customer Events?
Towards the end of 2022, Shopify announced Customer Events.
It’s a new feature that you can find on your dashboard and lets you add pixels manually or through apps.
And it’s very useful.
Here’s why:
1. Security
The main difference is that pixels added in Customer Events execute in a sandbox. This means that they can’t execute every kind of code, for security reasons.
Especially since third party vendors give these to you.
This is important because any code added by an app on your site can potentially steal sensitive information. Especially on the checkout page.
Or, it can change the actual content the user sees on the page.
Imagine if some code replaced the checkout’s credit card form with a fake one. Then just transmitted this info to an unknown server.
The sandbox prevents pixel code from having full access on the page. For example, they can’t access the password field of a login form.
They only have access to specific information provided by Shopify.
2. Organization
The second benefit is that you can have all your pixels in one place. No more copy-paste code inserted at different times and places throughout the theme.
This is especially important for event triggers, like the add_to_cart above. I’ll explain how these work with Custom Events, in a bit.
3. Checkout tracking
Code added in Customer Events, can also safely execute on every page of the checkout flow.
This is a huge difference compared to the before, where we had no access.
Also, important for Plus stores. Shopify has scheduled to stop allowing checkout.liquid customizations in the future. Customer Events will be the only way left to insert pixel code to checkout.
Update: In 2024, Shopify announced that the order confirmation page scripts will also be deprecated. One more reason to use Customer Events.
How can I track visitor behavior and customer events using the Shopify pixel manager?
Let’s assume your existing apps and sales channels don’t fulfill all your tracking needs.
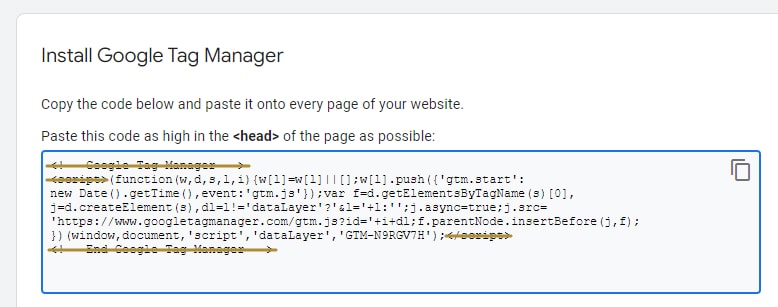
For example, let’s say that you want to track the SKUs of products added to cart. And let’s say you’re using Google Tag Manager to fire that trigger.
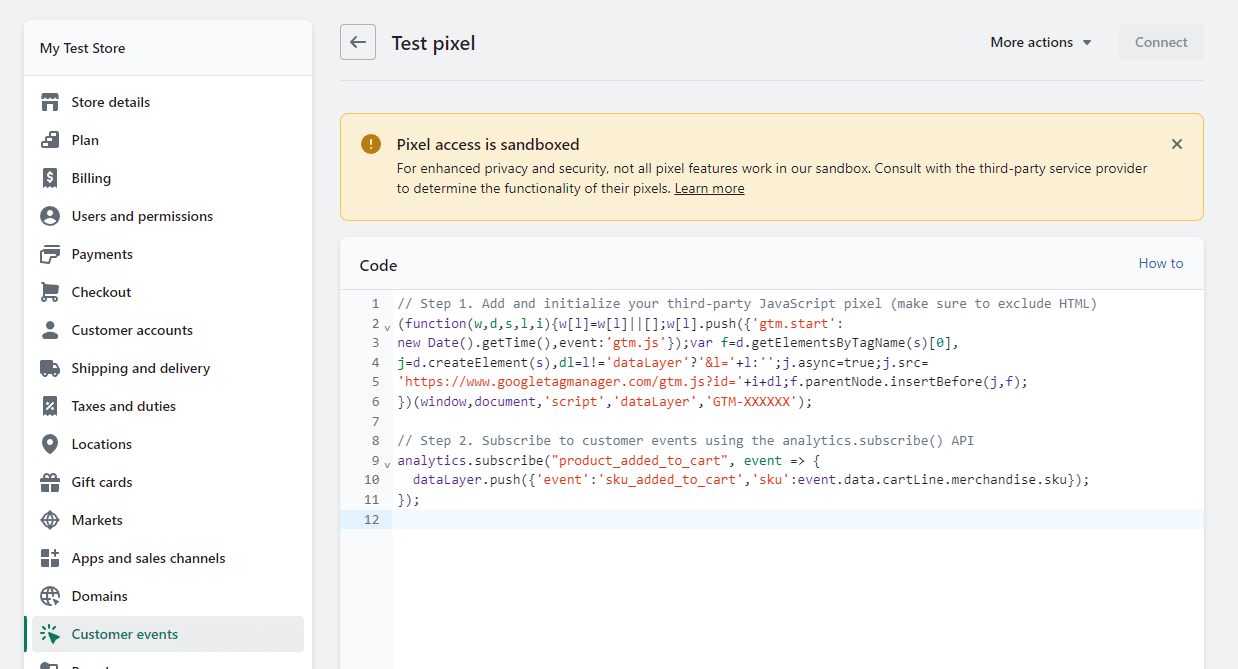
Here’s the code you would add, to implement this with Customer Events:
(function(w,d,s,l,i){w[l]=w[l]||[];w[l].push({'gtm.start':
new Date().getTime(),event:'gtm.js'});var f=d.getElementsByTagName(s)[0],
j=d.createElement(s),dl=l!='dataLayer'?'&l='+l:'';j.async=true;j.src=
'https://www.googletagmanager.com/gtm.js?id='+i+dl;f.parentNode.insertBefore(j,f);
})(window,document,'script','dataLayer','GTM-XXXXXX');
analytics.subscribe("product_added_to_cart", event => {
  dataLayer.push({'event':'sku_added_to_cart','sku':event.data.cartLine.merchandise.sku});
});
The event here is product_added_to_cart. It’s one of the standard events that are available to pixels, that Shopify’s code fires automatically. And they’re available for you to “subscribe” to them and perform your actions. And in this case, fire an event of your own with GTM.
(You are not limited to these standard events. You can fire and subscribe to custom events of your own. But this will need extra code added to the theme.)
Do I need to know how to code, to add pixels to Shopify?
In general, your marketing platform gives you a pixel to install on every page. The only complexity is that you need to remove the <script> and </script> tags, or other HTML code. Then paste the code between these, to the pixel box.
But sometimes your platform needs you to set up events to fire based on specific actions throughout the site. In that case, you would need to add the provided code inside a “subscribe” function like the one above. There, you would have to use variables such as event, and their properties to get information about the event.
That might be complicated if you’re not familiar with code. That’s why it’s easier to install an existing Shopify app that’s using the pixel manager.
Are there any downsides to using Customer Events vs. directly adding code to the theme?
There is one I can think of.
At the time of writing, the pixel sandboxes seem to be “initialized” about 1 second slower than code added to the theme’s files. Especially code that’s added to the top of the <head> element. Which is where you would add it to have it executed as fast as possible.

Why is this a problem?
Sometimes, users will visit a page and then immediately close the tab or go back. Or even click somewhere and go to another page.
If the pixel isn’t executed fast, it might not get to send the necessary information to the external platform before the user leaves the page.
This might show a lower bounce rate than the real one, in your analytics.
Of course, this is a general problem that’s already affecting millions of websites out there. With or without Shopify’s pixel manager.
Not because they are using a “slow” sandbox to execute their pixels. But because the current pixels fire after tons of other code.
For example, let’s say you have installed 30 apps on your site. And their code loads before your pixel. The result is, they will slow it down significantly. (That's one good reason to consider custom development.) The same goes if you had someone optimize the site without knowing what they’re doing. Pixels are delayed, which affects your tracking accuracy.
Thanks for reading! If you need help with adding tags and pixels, feel free to rech out using the contact form below.